How are camera bags constructed?

How are camera bags constructed?

How are camera bags constructed? Have you ever wondered what goes into making the perfect camera bag to protect your valuable gear?

The construction of a camera bag involves meticulous design and careful selection of materials to ensure both functionality and durability.

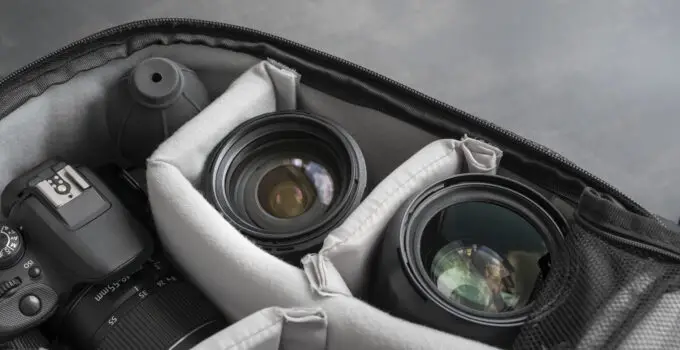
Camera bags are constructed with padded compartments, weather-resistant fabrics, and sturdy zippers. These elements work together to provide protection, organization, and easy access to your equipment.

High-quality camera bags also feature adjustable dividers and ergonomic designs for comfort during transport.

But what sets the best camera bags apart from the rest? In this article, we’ll delve into the details of camera bag construction, exploring the materials, craftsmanship, and innovations that make these essential accessories indispensable for photographers.

Let’s uncover the secrets behind the perfect camera bag.

How are camera bags constructed?

Camera bags are meticulously constructed to balance protection, organization, and durability.

Using durable, weather-resistant materials like nylon or polyester for the exterior and soft, padded fabrics for the interior, they ensure the safety of delicate equipment.

How are camera bags constructed?

Customizable, padded dividers provide tailored organization, while heavy-duty zippers and reinforced stitching enhance security and longevity.

The inclusion of ergonomic, padded straps and handles ensures comfortable carrying. Advanced features like weatherproofing and modular compartments further cater to diverse needs.

Here how to make your own camera bag?

Overall, camera bags are thoughtfully designed to offer photographers optimal functionality and protection for their valuable gear in various conditions.

Is it important to know how to construct a camera bag?

Knowing how to construct a camera bag is valuable, especially for those seeking customized solutions or aiming to enter the photography accessory market.

Understanding the construction process enables you to select the right materials and design features that meet specific needs, such as enhanced protection, better organization, or improved comfort.

This knowledge can help in assessing the quality and durability of commercially available bags, ensuring that they provide adequate protection for expensive and delicate equipment.

For DIY enthusiasts or small business owners, the ability to construct camera bags opens opportunities for creating personalized, unique designs that cater to niche markets.

Additionally, knowledge of construction techniques can assist in repairing or modifying existing bags, extending their lifespan and functionality.

Here, how to make a padded camera bag?

Overall, while not essential for all photographers, understanding camera bag construction can significantly benefit those looking to optimize their gear’s protection and accessibility.

Is it worth to know how to construct a camera bag?

Knowing how to construct a camera bag can be worthwhile, particularly for photographers and entrepreneurs.

For photographers, this knowledge allows customization of bags to meet specific needs, such as particular gear layouts, enhanced protection, or unique features not available in commercial products.

It also aids in evaluating and repairing existing bags, potentially saving money and extending the life of their gear.

For entrepreneurs or DIY enthusiasts, understanding camera bag construction opens up opportunities for creating and selling bespoke, high-quality camera bags.

This can cater to niche markets, offering tailored solutions that stand out from mass-produced options.

Additionally, it fosters innovation in design and functionality, potentially leading to the development of new products.

Here, how to make a padded camera bag?

While not essential for everyone, the skills and insights gained from understanding camera bag construction can provide significant benefits in terms of customization, cost savings, and business opportunities, making it a valuable area of knowledge for those with a vested interest.

9 steps to Construct a camera bag

Sure, here are the steps explained in detail for constructing a camera bag:

1. Design and Planning

Before starting construction, it’s crucial to design and plan your camera bag.

This step involves determining the size, shape, and features based on the equipment it needs to carry. Sketch your design, noting where compartments, pockets, and padding will be.

Consider ergonomic factors such as weight distribution, strap placement, and accessibility. Decide on materials that balance durability, weight, and water resistance.

2. Material Selection

Choose materials for both the exterior and interior of the bag. The exterior should be made of durable, water-resistant fabrics like nylon or polyester.

For the interior, use soft, non-abrasive materials to protect camera gear. Additionally, select high-density foam or padded inserts for shock absorption. Don’t forget to choose strong, reliable zippers, Velcro, and hardware for closures and adjustments.

3. Cutting the Fabric

Based on your design, measure and cut the fabric for the bag’s main body, compartments, and pockets.

Use a sharp rotary cutter or scissors to ensure clean edges. Cutting accurately is crucial for fitting pieces together correctly. Cut padding and lining materials to match these pieces. If using a pattern, follow it carefully to avoid mistakes.

4. Preparing Pockets and Compartments

Sew pockets and compartments before assembling the main body. Attach padding to each piece if required. Pockets can be sewn inside the bag lining or on the exterior for easy access.

How are camera bags constructed?

Ensure they are securely attached and can withstand the weight of the items they will carry. Use reinforced stitching for added durability.

5. Assembling the Main Body

Start assembling the main body of the bag by sewing together the pieces.

Begin with the front and back panels, then add the side panels. Ensure the seams are strong, especially at stress points. If your design includes a hard base, insert it now for added support.

6. Adding Padding and Lining

Attach the padding to the inside of the bag, ensuring it fits snugly without bunching. Then, add the lining, which should be soft and non-abrasive to protect your camera gear.

Securely stitch the lining in place, ensuring it covers all internal seams and padding. This step is crucial for protecting your equipment from bumps and scratches.

7. Installing Zippers and Closures

Install zippers and other closures, such as Velcro or buckles.

These should be heavy-duty to ensure they can handle repeated use. Attach zippers to the main openings of the bag, making sure they align properly and open and close smoothly.

Reinforce the stitching around zippers to prevent them from ripping away from the fabric over time.

8. Attaching Straps and Handles

Attach the straps and handles to your bag. Ensure they are securely sewn and reinforced, as they will bear the weight of the bag. For shoulder straps, consider adding padding for comfort.

Adjustable straps are ideal for customizing the fit. Handles should be placed for balanced carrying, reducing strain on the user.

Here, does north face make a camera bag?

9. Final Inspection and Adjustments

Inspect the finished bag thoroughly. Check all seams, zippers, and attachments for strength and functionality.

Test the bag with equipment to ensure it fits well and is easy to access. Make any necessary adjustments, such as tightening seams or adding additional reinforcement.

A thorough inspection ensures the bag is ready for use and will provide lasting protection for camera gear.

Each of these steps is crucial for creating a high-quality camera bag that meets specific needs, offers protection, and provides ease of use for photographers.

5 methods to construct a camera bag 

1. Traditional Sewing Method

The traditional sewing method involves using a sewing machine to assemble the various parts of the camera bag.

This process starts with a well-thought-out design and a detailed pattern. The key steps include cutting the fabric pieces according to the pattern, sewing the exterior fabric, lining, and padding together, and then attaching pockets, compartments, and straps.

This method allows for precise customization and is ideal for creating bespoke, high-quality camera bags.

To start, measure and cut your chosen fabrics—typically durable materials like nylon or canvas for the exterior, and softer, non-abrasive materials for the interior.

Sewing these together with high-density foam padding ensures the bag can protect sensitive equipment.

Using a heavy-duty sewing machine is advisable, especially for stitching thick layers of fabric and padding.

Attention to detail is crucial when sewing zippers, pockets, and compartments. Reinforcing seams, especially at stress points, enhances the bag’s durability.

Additionally, attaching straps and handles securely ensures they can bear the bag’s weight. This method, while labor-intensive, results in a durable and tailored camera bag, perfectly suited to the user’s needs.

2. Modular Assembly Method

The modular assembly method involves creating separate components or modules of the bag that can be assembled into the final product.

Each module, such as pockets, compartments, or padding sections, is constructed individually and then connected. This method offers flexibility in design and allows for easy modifications or repairs.

Start by designing each module independently, considering how they will connect. For instance, pockets can be made separately with their own padding and then attached to the main body using Velcro or zippers.

This approach allows for interchangeable parts, so users can customize their bags according to specific needs on different days.

Construct each module using traditional sewing techniques, ensuring strong seams and reinforced stress points. Once all modules are complete, assemble them into the main body of the bag.

This modular approach is particularly useful for photographers who require different configurations for various types of shoots. It also simplifies the construction process by breaking it down into manageable parts.

3. No-Sew Method

The no-sew method involves constructing a camera bag without traditional sewing techniques.

Instead, this method uses adhesives, fabric tapes, and other fastening methods.

While it may not offer the same durability as sewn bags, it’s an accessible option for DIY enthusiasts or those lacking sewing skills or equipment.

Begin by selecting durable fabrics and padding materials.

Cut these materials according to your design, ensuring precise measurements. Use strong fabric glue or double-sided fabric tape to bond the pieces together. When attaching zippers, pockets, and compartments, use adhesive-backed Velcro or snap buttons to secure them in place.

This method requires careful application of adhesives to ensure a strong bond. Reinforce edges and stress points with additional layers of tape or glue.

While the no-sew method might not withstand heavy use as well as sewn bags, it provides a quick and easy way to create a functional camera bag. This approach is ideal for creating lightweight, temporary, or prototype bags.

4. Upcycling Method

The upcycling method involves repurposing existing materials or products to create a camera bag.

This eco-friendly approach not only reduces waste but also results in unique, customized bags.

Common items to upcycle include old bags, clothing, or other fabric items that have durable and protective qualities.

Start by identifying suitable materials and deconstructing them.

For instance, an old backpack can provide sturdy fabric, zippers, and straps. Clean and prepare these materials before cutting them into the necessary shapes and sizes according to your design.

Using a sewing machine or hand stitching, assemble the upcycled materials into a new camera bag. Reinforce seams and stress points to ensure durability.

This method allows for creative designs and can result in a highly personalized product. Additionally, it promotes sustainability by giving new life to materials that might otherwise be discarded.

5. Custom Professional Manufacturing

For those seeking high-quality, professionally-made camera bags, custom manufacturing is an ideal method.

This involves collaborating with a manufacturer who specializes in camera bags or protective cases.

The process typically starts with a detailed design and specification phase, where the client’s needs are translated into technical drawings and prototypes.

Working with professionals allows access to advanced materials and construction techniques, such as heat-sealed seams for waterproofing or CNC-cut foam inserts for precision protection.

The manufacturer will create prototypes based on the design, allowing for testing and feedback before final production.

Here, does tumi make a camera bag?

Custom professional manufacturing ensures a high level of craftsmanship and durability. It’s ideal for photographers with specific requirements that off-the-shelf bags cannot meet.

Although this method can be costly and time-consuming, it results in a top-tier product tailored to exact specifications, combining professional quality with bespoke design features.

5 benefits of construct your camera bag 

1. Customization

Constructing your own camera bag allows for complete customization, ensuring it meets your specific needs and preferences.

Unlike commercially available bags, which are designed for mass appeal, a custom-built camera bag can be tailored to fit your exact equipment, workflow, and style.

How are camera bags constructed?

You can choose the exact dimensions, number and type of compartments, padding thickness, and additional features such as weatherproofing or specialized pockets for accessories.

Customization also extends to the aesthetic aspects of the bag.

You can select materials, colors, and designs that reflect your personal style or brand identity, making your camera bag not only functional but also a unique expression of your personality.

This level of personalization ensures that every aspect of the bag contributes to your efficiency and convenience as a photographer.

2. Enhanced Protection

A custom-built camera bag can provide superior protection for your gear.

By selecting high-quality materials and incorporating ample padding, you can ensure that your camera and lenses are well-protected from physical impacts, moisture, and dust.

Custom bags can be designed with specific compartments that fit your equipment snugly, preventing movement and reducing the risk of damage during transport.

You can also incorporate features like reinforced stitching, heavy-duty zippers, and waterproof linings, which add layers of protection that may not be present in standard camera bags.

This ensures that your valuable equipment remains safe in various environments, whether you’re shooting in a bustling city or a rugged outdoor location.

3. Cost-Effectiveness

Constructing your own camera bag can be more cost-effective compared to purchasing high-end commercial options.

While the initial investment in materials and tools might seem significant, the long-term savings can be substantial.

By sourcing your own materials and building the bag yourself, you eliminate the markup costs associated with branded products.

Additionally, you have control over the budget, allowing you to prioritize spending on features that matter most to you.

Furthermore, a well-constructed custom bag can have a longer lifespan than cheaper, mass-produced alternatives, reducing the need for frequent replacements.

Here, can you buy just camera bag pads?

This durability translates to cost savings over time, making it a financially prudent choice for serious photographers.

4. Learning and Skill Development

The process of constructing your own camera bag provides an excellent opportunity to develop valuable skills.

You’ll gain hands-on experience in design, sewing, and possibly other crafts like pattern making or fabric manipulation.

These skills can be applied to other projects, enhancing your ability to create and customize various items beyond camera bags.

Moreover, the problem-solving and creative thinking involved in designing and constructing a custom camera bag can be intellectually stimulating and rewarding.

As you navigate challenges and refine your techniques, you build a sense of accomplishment and confidence in your abilities.

This learning experience can be both practical and personally fulfilling, enriching your overall skill set.

5. Sustainability

Building your own camera bag can be a more sustainable option compared to buying a new one.

By using upcycled materials or selecting eco-friendly fabrics, you reduce waste and minimize the environmental impact associated with the production and transportation of mass-produced bags.

This approach promotes a more sustainable lifestyle and encourages responsible consumption.

Additionally, the ability to repair and modify your custom-made bag further enhances its sustainability.

Instead of discarding a worn or damaged bag, you can easily replace parts or reinforce weak areas, extending its usability and reducing the need for new resources.

This commitment to sustainability not only benefits the environment but also aligns with ethical practices in responsible consumption and production.

In summary, constructing your own camera bag offers significant benefits in terms of customization, protection, cost-effectiveness, skill development, and sustainability.

These advantages make it a worthwhile endeavor for photographers who seek a personalized, durable, and eco-friendly solution for carrying their gear.

Related faq’s

What materials are commonly used in the construction of camera bags?

Camera bags are typically constructed using a variety of durable and protective materials.

The exterior often features tough, water-resistant fabrics like nylon, polyester, or canvas, which shield the equipment from harsh weather conditions and physical damage.

The interior is usually lined with soft, non-abrasive materials such as microfiber or padded foam to protect delicate camera gear from scratches and impacts.

High-density foam or padded dividers are used to cushion and organize the equipment.

Additionally, heavy-duty zippers, reinforced stitching, and strong hardware like buckles and clips are essential for durability and secure closure.

How are the compartments and padding designed in a camera bag?

The compartments and padding in a camera bag are designed with the specific needs of photographers in mind.

Padded dividers, often adjustable and removable, are used to create customizable compartments within the main storage area.

Here, how to clean lululemon camera bag?

These dividers are typically attached with Velcro, allowing photographers to configure the interior layout to fit different sizes and shapes of cameras, lenses, and accessories.

The padding is usually made from high-density foam to provide adequate shock absorption and protection.

Some camera bags also include specialized compartments for small items like memory cards, batteries, and filters, ensuring everything is organized and easily accessible.

What are the different types of closures used in camera bags?

Camera bags use various types of closures to ensure security and ease of access.

The most common closures include heavy-duty zippers, which are used for the main compartments and pockets due to their durability and secure seal.

Velcro is often used for smaller pockets or adjustable dividers within the bag.

Some camera bags feature buckles or clips, which provide additional security for external straps and flaps. Magnetic closures can also be found in some designs for quick and silent access.

Each type of closure is chosen based on its ability to keep the contents secure while allowing convenient access when needed.

How are straps and handles attached to a camera bag?

Straps and handles are crucial for the functionality and comfort of a camera bag and are attached with reinforced stitching to ensure they can support the weight of the equipment.

Shoulder straps often have adjustable lengths and may include padding for extra comfort during extended use.

These straps are usually attached to the bag with strong, stitched-in D-rings or buckles.

Handles are typically sewn into the top of the bag and are reinforced at multiple points to distribute the weight evenly and prevent tearing.

Some bags also include additional straps for attaching to rolling luggage or securing tripods, which are designed to be sturdy and reliable.

How can camera bags be made weather-resistant?

Weather resistance is a critical feature for camera bags, achieved through several design and material choices.

The exterior fabric is often treated with water-resistant coatings or made from inherently waterproof materials like nylon or polyester. Seams may be sealed or taped to prevent water ingress.

Zippers can be covered with storm flaps or made from waterproof materials to keep moisture out.

Some camera bags include integrated rain covers that can be deployed during heavy rain to provide an extra layer of protection.

Additionally, using materials that are resistant to dust and abrasion helps maintain the bag’s integrity and protect the equipment inside under various environmental conditions.

Conclusion:

Camera bags are meticulously constructed to balance protection, organization, and durability.

Using durable, weather-resistant materials like nylon or polyester for the exterior and soft, padded fabrics for the interior, they ensure the safety of delicate equipment.

Customizable, padded dividers provide tailored organization, while heavy-duty zippers and reinforced stitching enhance security and longevity.

The inclusion of ergonomic, padded straps and handles ensures comfortable carrying. Advanced features like weatherproofing and modular compartments further cater to diverse needs.

Overall, camera bags are thoughtfully designed to offer photographers optimal functionality and protection for their valuable gear in various conditions.


Leave a Reply