Are you someone who loves to capture the world through the lens of your camera? Do you often find yourself fumbling through your camera bag, searching for the right lens or accessory?
If yes, then this article is just for you! In this post, we will guide you on how to arrange your camera bag like a pro, so you never miss a shot again.
Arranging your camera bag may seem like a trivial task, but it can make a huge difference in your photography experience.
To begin with, organize your gear based on its frequency of use, making sure to keep the most frequently used items within easy reach.
Then, create designated slots for each item and label them accordingly, ensuring that you can easily find what you need.
But, that’s not all! We have consulted with professional photographers and camera experts to bring you some valuable tips and tricks to optimize your camera bag arrangement.
So, without further ado, let’s dive in and elevate your photography game with a well-organized camera bag.
How to Arrange Your Camera Bag for Maximum Efficiency
At some point in your photography journey, you’re bound to realize that carrying all your gear around can be a pain. If you’re not careful, it can lead to a lot of wasted time and frustration when you’re out on a shoot.
In this article, we’re going to provide some tips on how to arrange your camera bag so that everything is organized and easily accessible, allowing you to shoot with maximum efficiency.
Choose the Right Bag
Before we dive into how to organize your camera bag, it’s important to make sure you have the right bag for your needs.
There are plenty of different styles and sizes of camera bags out there, so it’s important to choose one that will work well for you.
Consider the size of your camera and lenses, as well as any other gear you typically carry with you, such as a tripod, filters, or a laptop.
A bag that’s too small will be frustrating to work with, while one that’s too large may be difficult to carry around all day.
Organize by Function
Once you have your camera bag, the key to maximizing efficiency is to organize it by function. Start by grouping your gear into categories, such as lenses, camera body, accessories, and so on.
Then, think about how you typically shoot and organize your gear accordingly. For example, if you frequently shoot portraits, you’ll want to make sure your portrait lens is easily accessible.
One common approach is to organize gear by size, with the largest items at the bottom of the bag and the smaller items on top. This can help distribute weight more evenly and prevent smaller items from getting lost at the bottom of the bag.
Use Dividers and Pockets
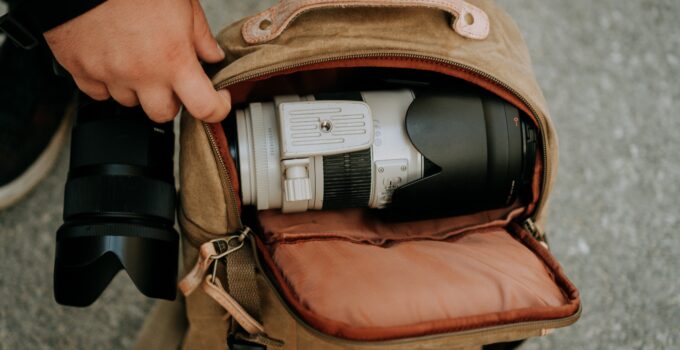
Most camera bags come with dividers and pockets that can help you organize your gear.
Take advantage of these features to keep everything in its place. Use dividers to separate larger items from each other, and use pockets for smaller accessories like memory cards, batteries, and filters.

Picture of girl in jeans sitting on floor with camera, laptop and phone
Consider using color-coded dividers or labels to make it easier to find what you’re looking for quickly. For example, you might use a red divider for your portrait lens and a blue one for your landscape lens.
Think About Accessibility
When you’re shooting, it’s important to be able to access your gear quickly and easily. Consider how you typically shoot and organize your gear accordingly.
For example, if you frequently shoot in low light, you’ll want to make sure your flash is easily accessible.
Keep in mind that accessibility may also depend on the type of bag you have. If you have a backpack-style bag, you may need to take the bag off to access your gear, while a shoulder bag may allow for quicker access.
Practice Makes Perfect
Finally, remember that organizing your camera bag is a process that takes time and practice.
Don’t be afraid to experiment with different configurations until you find one that works well for you. And don’t be afraid to make adjustments as your shooting style and gear changes over time.
By taking the time to organize your camera bag, you’ll be able to shoot more efficiently and enjoy your photography more.
Related FAQ’s
How do you layout a camera bag?
Sure thing! As a language model, I don’t have the luxury of physically organizing a camera bag myself, but I’d be happy to provide some tips on how to efficiently layout your camera bag.
First of all, it’s important to consider the size of your bag and the amount of gear you have. A smaller bag will obviously have less room, so you’ll want to prioritize the most essential items.
A larger bag will give you more room to work with, but it’s still important to be organized and efficient so you can quickly access the gear you need.
One helpful approach is to organize your gear by category. For example, you could have a section for lenses, another for camera bodies, and another for accessories like batteries, memory cards, and filters. Within each section, you could further organize items by size or frequency of use.
Another helpful tip is to use pouches or dividers to keep your gear separate and protected.
This can also help you quickly locate specific items without having to dig through the entire bag. Consider using different colored pouches to further organize your gear by category or priority.
It’s also important to consider weight distribution when laying out your camera bag. You don’t want all your heaviest items on one side of the bag, as this can cause strain on your shoulders and back.
Instead, try to distribute the weight evenly throughout the bag. You may also want to consider a backpack-style camera bag, which can provide better weight distribution and be more comfortable to carry for longer periods of time.
Finally, be sure to leave some extra room in your camera bag for unexpected items like rain covers or snacks. You never know when you might need them!
Overall, organizing your camera bag is all about finding a system that works for you and your gear. Experiment with different layouts and techniques until you find what works best.
How do you load a camera bag?
Loading a camera bag can be a bit of an art form, but with a little bit of planning and organization, it can be a breeze. Here are some tips to help you load your camera bag efficiently and effectively:
Start with your camera bodies: Depending on the size of your camera bag, you may be able to fit multiple camera bodies. Start by placing them in the main compartment of the bag, making sure to leave enough space for your other gear.
Organize your lenses: Once your camera bodies are in place, organize your lenses by size or focal length. You can use dividers or pouches to keep them separate and protected.
Add accessories: Next, add any accessories like batteries, memory cards, filters, and cables. These can be stored in the pockets or compartments of the bag.
Consider weight distribution: As you load your gear, consider the weight distribution of the bag. Place heavier items towards the bottom of the bag to keep it balanced and comfortable to carry.
Leave room for extras: Finally, make sure to leave some extra room in your camera bag for unexpected items like rain covers, snacks, or a water bottle.
It’s important to note that every camera bag is different, so you may need to experiment with different layouts to find what works best for you and your gear.
However, by following these general guidelines, you’ll be able to load your camera bag in a way that is organized, efficient, and comfortable to carry. Happy shooting!
What should I put in my camera bag?
Deciding what to put in your camera bag can be a bit overwhelming, especially if you have a lot of gear to choose from. Here are some items that you might consider including in your camera bag to get you started:
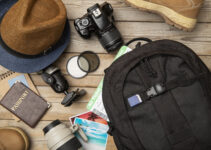
- Camera bodies: This is obviously the most important item for any photographer. Make sure to include all the camera bodies that you plan on using.
- Lenses: Depending on what kind of photography you do, you may want to include a variety of lenses in your bag. Wide-angle lenses are great for landscape photography, while telephoto lenses are ideal for wildlife or sports photography.
- Batteries and chargers: Always bring extra batteries and chargers with you to ensure you don’t run out of power while shooting.
- Memory cards: Make sure to have enough memory cards on hand to capture all the shots you want.
- Filters: Filters can be a great way to enhance your photos, whether you’re using a polarizer to reduce glare or a neutral density filter to create long exposures.
- Tripod: If you plan on doing any landscape or low-light photography, a sturdy tripod is essential.
- Cleaning kit: Dust and dirt can quickly accumulate on your gear, so make sure to bring a cleaning kit with you to keep your lenses and camera bodies clean.
- Camera strap: A comfortable camera strap can make a big difference in how comfortable you are while carrying your camera around.
- Rain cover: Weather can be unpredictable, so it’s always a good idea to have a rain cover on hand to protect your gear from the elements.
- Personal items: Don’t forget to bring any personal items you might need, like water, snacks, or a phone charger.
Remember, every photographer has different needs and preferences, so the items you choose to include in your camera bag will depend on what kind of photography you do and what gear you have.
However, by including these essentials, you’ll be well-equipped to capture stunning photos no matter where your photography takes you.
What is the proper way to carry my camera?
Carrying your camera properly is important not only for the safety of your gear, but also for your own comfort and convenience. Here are some tips for carrying your camera the right way:
- Use a camera strap: A camera strap is a simple but essential accessory for carrying your camera. Make sure to attach it securely to your camera and wear it around your neck or shoulder to prevent your camera from accidentally falling or getting stolen.
- Hold your camera with both hands: When taking photos, make sure to hold your camera with both hands for stability and to prevent dropping it. This is especially important if you have a larger, heavier camera.
- Keep your camera close to your body: When you’re not taking photos, keep your camera close to your body to prevent it from swinging around and potentially hitting objects or people.
- Use a camera bag: If you’re traveling with your camera or plan on carrying multiple lenses and accessories, a camera bag can be a great investment. Look for a bag with padded compartments to protect your gear and a comfortable strap or handle for easy carrying.
- Be aware of your surroundings: Whether you’re walking through a crowded city or hiking in the wilderness, it’s important to be aware of your surroundings and any potential hazards that could damage your gear. Keep your camera close and be cautious of any potential risks.
By following these tips, you can ensure that you’re carrying your camera in a safe and comfortable way that will allow you to capture stunning photos wherever your photography takes you.
Conclusion:
In conclusion, arranging a camera bag is an essential aspect of photography that helps ensure that you have all the equipment you need for your shoot.
Whether you’re a professional photographer or a hobbyist, organizing your camera bag can help you save time and avoid missing out on a perfect shot.
Remember to plan ahead and consider the type of shoot you will be undertaking, the equipment you will need, and how you will access each item quickly.
Use dividers, pouches, and sleeves to protect your gear and keep them organized.
By following these simple tips, you can optimize your camera bag’s space, protect your equipment, and streamline your workflow, making your next photo shoot an enjoyable and productive experience.

