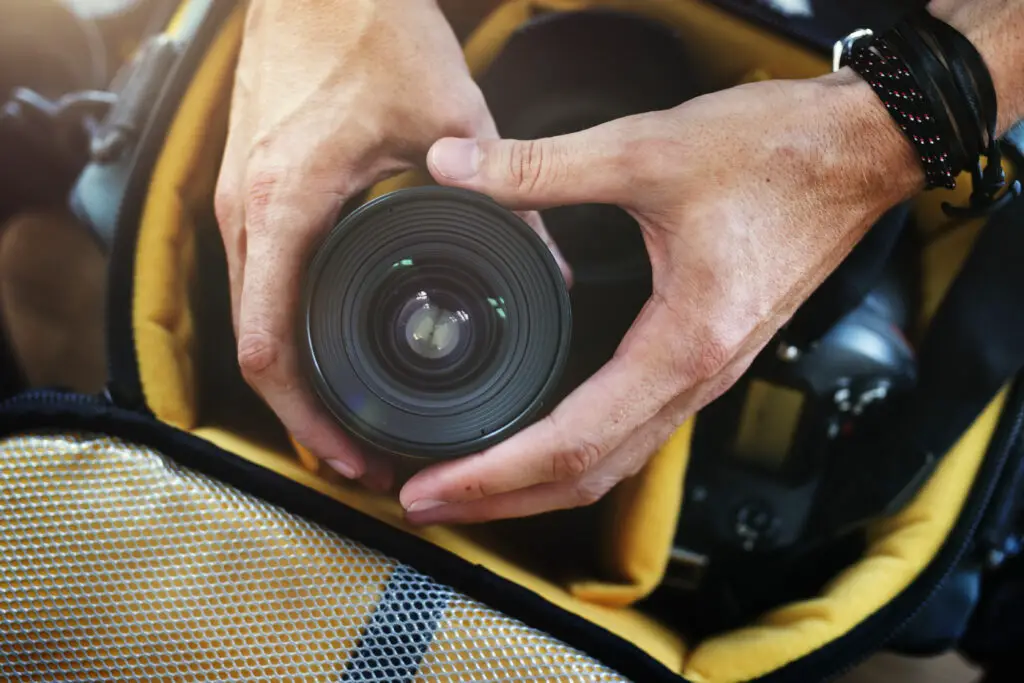
Wondering how to keep your Lifeproof case camera lens crystal clear?
Whether you’re capturing underwater adventures or everyday moments, maintaining a clean lens is essential for sharp, vibrant photos. Have you ever noticed specks or smudges on your photos and wondered how to prevent them?
Cleaning your Lifeproof case camera lens is easier than you might think.
Using a microfiber cloth and a gentle lens cleaning solution, carefully wipe away any dust or fingerprints. Avoid harsh cleaners or abrasive materials that could scratch the lens.
Curious to learn more about the best practices for keeping your camera lens pristine?
Dive into our comprehensive guide, where we explore expert tips from seasoned photographers and detail step-by-step instructions to ensure your Lifeproof case camera lens remains spotless. Don’t miss out on capturing perfect moments due to a dirty lens!
Here what is the purpose of camera bag?
How to clean lifeproof case camera lens?
To clean the camera lens on a LifeProof case, follow these steps:
- Remove the Case: Carefully detach the LifeProof case from your phone to avoid any damage.
- Use Compressed Air: Blow off any loose dust and debris with a can of compressed air. This helps prevent scratching.
- Microfiber Cloth: Gently wipe the lens area with a microfiber cloth. Avoid using rough materials that could scratch the lens.
- Cleaning Solution: If needed, apply a small amount of lens cleaning solution or isopropyl alcohol (70% or higher) to the cloth, not directly on the lens.
- Circular Motion: Clean the lens in a circular motion to ensure thorough cleaning and prevent streaks.
- Dry Cloth: Finish by wiping with a dry section of the microfiber cloth to remove any remaining moisture.
- Reassemble: Once the lens is clean and dry, reassemble the case onto your phone.
Regular cleaning helps maintain clear photo quality and case longevity.
When to clean lifeproof case camera lens?
Cleaning the camera lens on your LifeProof case is crucial for maintaining optimal photo quality. Here’s when to clean it:
- After Outdoor Activities: If you’ve been hiking, swimming, or participating in other outdoor activities, clean the lens to remove dust, dirt, or water spots.
- Visible Smudges: Clean the lens whenever you notice fingerprints, smudges, or streaks affecting your photos.
- Routine Maintenance: Regularly clean the lens every few weeks as part of your phone maintenance routine, even if no visible dirt is present.
- After Exposure to Elements: If your phone has been exposed to sand, mud, or other elements, clean the lens immediately to prevent scratches and buildup.
- Declining Photo Quality: If you observe a decline in photo clarity or quality, it’s a good indication that the lens needs cleaning.
Regular cleaning ensures clear, high-quality photos and maintains the integrity of your LifeProof case.
Here, will leather good camera bag review.
Is it important to clean lifeproof camera lens?
Yes, it is important to clean the camera lens on your LifeProof case. Here’s why:
- Photo Quality: Dirt, smudges, and debris on the lens can significantly degrade photo and video quality, resulting in blurry or distorted images.
- Longevity of the Case: Regular cleaning helps maintain the integrity and clarity of the lens cover, ensuring your LifeProof case continues to provide optimal protection and performance.
- Prevent Damage: Accumulated dirt and particles can scratch the lens cover if not removed, potentially causing permanent damage.
- Hygiene: Regular cleaning removes bacteria and germs that can accumulate on the lens and case, promoting better hygiene.
- Optimal Functionality: A clean lens ensures that features like autofocus and flash operate correctly, enhancing your phone’s overall functionality.
In summary, cleaning the camera lens is essential for maintaining photo quality, protecting your case, and ensuring your phone functions optimally.
How do I clean my LifeProof case?
To clean your LifeProof case, follow these steps:
- Remove the Case: Carefully detach the LifeProof case from your phone.
- Rinse with Water: Rinse the case under warm running water to remove loose dirt and debris. Ensure the ports and openings are tightly closed to prevent water ingress.
- Mild Soap Solution: Prepare a mild soap solution with water. Use a soft cloth or sponge to gently scrub the case, focusing on areas with dirt buildup.
- Toothbrush for Crevices: Use a soft-bristled toothbrush to clean hard-to-reach areas, such as the ports, buttons, and edges.
- Rinse and Dry: Rinse the case thoroughly with clean water to remove soap residue. Dry it with a lint-free cloth and let it air dry completely.
- Inspect for Damage: Check for any wear and tear, ensuring seals and gaskets are intact.
- Reassemble: Once dry, reassemble the case onto your phone.
Regular cleaning helps maintain the case’s protective qualities and ensures optimal performance.
How to get scratches out of a LifeProof case?
Removing scratches from a LifeProof case can help restore its appearance and functionality. Here’s how:
- Assess the Damage: Determine the depth of the scratches. Minor scratches are easier to handle than deep ones.
- Plastic Polish: Use a plastic polish or a scratch remover designed for plastics. Apply a small amount to a soft, clean cloth.
- Buffing: Gently buff the scratched area in a circular motion using the cloth with the polish. Avoid excessive pressure to prevent further damage.
- Rinse and Dry: After polishing, rinse the case with water to remove any residue and dry it with a lint-free cloth.
- Microfiber Cloth: For very fine scratches, using a microfiber cloth alone might be sufficient to reduce their appearance.
- Prevent Future Scratches: Keep your case clean and avoid placing it on rough surfaces.
If the scratches are deep or on critical areas like the screen cover, consider contacting LifeProof support for replacement options.
Do LifeProof cases protect the camera?
Yes, LifeProof cases do protect the camera. Here’s how:

- Lens Cover: LifeProof cases feature a built-in lens cover that safeguards the camera lens from scratches, dust, and dirt. This ensures your lens remains clear for high-quality photos and videos.
- Shock Absorption: These cases are designed to absorb shocks and impacts, protecting the camera from drops and bumps.
- Waterproof Seal: LifeProof cases are waterproof, preventing water from reaching the camera. This is particularly useful for underwater photography and protecting the camera in wet environments.
- Dust and Dirt Protection: The sealed design keeps out dust and dirt, which can damage the camera over time.
- Durability: Made from robust materials, LifeProof cases offer long-lasting protection for all parts of your phone, including the camera.
Overall, LifeProof cases provide comprehensive protection, ensuring your camera stays in optimal condition.
Here, does a camera bag count as a carry on bus?
How do you clean a waterproof phone case?
Cleaning a waterproof phone case properly ensures its continued effectiveness and longevity. Here’s how:
- Remove the Case: Carefully detach the waterproof case from your phone.
- Rinse with Water: Rinse the case under warm running water to remove loose dirt and debris. Ensure all openings are securely closed to maintain water resistance.
- Mild Soap Solution: Prepare a solution of mild soap and water. Use a soft cloth or sponge to gently scrub the case, paying attention to areas with more dirt buildup.
- Toothbrush for Crevices: Use a soft-bristled toothbrush to clean tight spots like ports, buttons, and edges.
- Rinse and Dry: Thoroughly rinse the case with clean water to remove soap residue. Dry it with a lint-free cloth and allow it to air dry completely.
- Inspect Seals: Check all seals and gaskets for wear and tear to ensure they maintain their waterproof capability.
Regular cleaning maintains the case’s protective features and ensures your phone remains safe.
Camera blurry: How to fix it?
If your camera is consistently blurry, try these steps to troubleshoot and potentially fix the issue:
- Clean the Lens: Wipe the camera lens with a microfiber cloth to remove any smudges, fingerprints, or dirt that might be causing the blurriness.
- Check Autofocus: Ensure that the autofocus is enabled and functioning correctly. Tap on the screen where you want to focus or adjust the focus settings manually if available.
- Restart Your Phone: Sometimes, a simple restart can resolve software glitches affecting the camera’s performance.
- Update Camera App: Ensure your camera app is updated to the latest version available, as updates often include bug fixes and improvements.
- Check for Software Updates: Update your phone’s operating system to the latest version, as this can also address camera issues.
- Disable Camera Filters: If you have applied any filters or effects, disable them to see if they are causing the blurriness.
- Inspect the Lens for Damage: If none of the above steps work, inspect the camera lens for any physical damage. Scratches or cracks on the lens cover can cause blurriness and may require replacement.
If these steps don’t resolve the issue, consider contacting technical support or visiting a professional for further diagnosis and repair.
Anyone had/fixed camera lens cover scratches?
If you have scratches on your camera lens cover, there are several methods you can try to fix or reduce them:
- Plastic Polish: Use a plastic polish specifically designed for removing scratches from clear plastics. Apply a small amount to a soft, clean cloth and buff the scratched area in circular motions. This can help to gradually reduce the visibility of the scratches.
- Toothpaste: Non-gel toothpaste can also work as a mild abrasive to buff out scratches. Apply a small amount to the lens cover and gently rub in circular motions with a soft cloth. Rinse thoroughly afterward.
- Baking Soda Paste: Make a paste using baking soda and water. Apply it to the scratches and gently rub with a soft cloth. Rinse thoroughly and dry.
- Scratch Remover Kits: There are commercial scratch remover kits available that are specifically formulated for plastic surfaces. Follow the instructions provided with the kit for best results.
- Replacement: If the scratches are deep and affecting photo quality, consider replacing the lens cover. Contact the manufacturer or a professional repair service for assistance.
Always proceed with caution when attempting to remove scratches to avoid causing further damage to the lens cover.
Any way to clean my Lifeproof Fre case?
Cleaning your LifeProof Fre case is essential to maintain its functionality and appearance:
- Remove the Case: Take your phone out of the LifeProof Fre case carefully.
- Rinse with Water: Rinse the case under lukewarm running water to remove dirt and debris. Ensure all ports are tightly closed to prevent water from entering.
- Use Mild Soap: Create a solution of mild soap and water. Use a soft cloth or sponge to gently clean the case, paying attention to areas with dirt buildup.
- Toothbrush for Detailing: Use a soft-bristled toothbrush to clean difficult-to-reach spots like port openings and edges.
- Rinse and Dry: Rinse the case thoroughly with clean water to remove any soap residue. Dry it with a lint-free cloth and allow it to air dry completely before reassembling it with your phone.
Regularly cleaning your LifeProof Fre case helps to maintain its waterproof seal and prolongs its durability.
Here, how do you clean a canvas bag with leather strap?
Lifeproof case causing fuzzy pictures
If your LifeProof case is causing fuzzy pictures, it may be due to dirt, smudges, or a misalignment affecting the camera lens cover.
Clean the case and lens thoroughly with a soft cloth and ensure there are no obstructions or residues. Also, check that the case is properly fitted and not obstructing the camera lens or sensors.
If the issue persists, consider removing the case temporarily to compare picture quality.
Sometimes, slight adjustments or cleaning can significantly improve photo clarity when using a LifeProof case.
9 Steps to clean lifeproof case camera lens
Certainly! Here are detailed explanations for each step to clean the LifeProof case camera lens:
Step 1: Remove the Case
Removing the LifeProof case from your phone is the first step to ensure you can access and clean the camera lens effectively.
Carefully detach the case from your phone, ensuring you do so gently to avoid any accidental damage to either the case or the phone itself.
This step is crucial as it allows you full access to the camera lens area without any obstruction from the case.
Step 2: Inspect the Lens
Before cleaning, take a moment to inspect the camera lens for any visible dirt, smudges, or fingerprints.
This inspection helps you identify the areas that need cleaning the most.
If there are any stubborn stains or dirt buildup, you’ll be able to prioritize those areas during the cleaning process. It’s also a good idea to check for any scratches on the lens cover that might affect photo quality.
Step 3: Use Compressed Air
Start by using a can of compressed air to blow away any loose dust or debris from the camera lens area. This step is important because it helps prevent scratching the lens when you start wiping it with a cloth.
Hold the can upright and use short bursts of air to ensure thorough cleaning without damaging the delicate components of the camera lens.
Here, how to clean a underwater camera housing?
Step 4: Prepare Cleaning Solution
Prepare a gentle cleaning solution using lukewarm water and a mild soap or dishwashing liquid.
Avoid using harsh chemicals or abrasive cleaners that could damage the lens cover or the waterproof seals of the LifeProof case. Mix the soap with water in a small bowl or container until it creates a slightly soapy solution.
Step 5: Dampen a Microfiber Cloth
Take a clean, soft microfiber cloth and dampen it with the prepared cleaning solution. It’s essential to use a microfiber cloth because it is gentle and won’t scratch the lens cover or leave lint behind.
Wring out any excess liquid from the cloth to ensure it’s only slightly damp and not dripping wet. This helps prevent water from seeping into the case and potentially damaging your phone.
Step 6: Wipe the Lens in Circular Motion
Gently wipe the camera lens cover in a circular motion with the dampened microfiber cloth. Start from the center of the lens and work your way outwards to ensure thorough cleaning.
The circular motion helps lift dirt and smudges effectively without spreading them around or causing streaks on the lens cover.
Apply light pressure while wiping to avoid pressing any dirt particles into the lens cover, which could potentially scratch it.
Step 7: Dry with Dry Microfiber Cloth
After cleaning with the damp cloth, use a dry microfiber cloth to gently dry the camera lens cover.
Again, use a circular motion to ensure all moisture is removed from the lens cover and surrounding areas.
This step helps prevent water spots from forming and ensures the lens cover is completely dry before reassembling the LifeProof case onto your phone.
Step 8: Reassemble the Case
Once the camera lens cover is thoroughly cleaned and dried, carefully reassemble the LifeProof case onto your phone.
Ensure all seals and closures are securely fastened to maintain the case’s waterproof and dustproof properties.
Take your time during this step to ensure the case fits snugly and correctly aligns with the camera lens and other phone components.
Here, Do i open my camera bag at TSA?
Step 9: Test Camera Functionality
After cleaning and reassembling the LifeProof case, test the functionality of the camera to ensure it’s working properly.

Take a few test photos or videos to verify that the cleaning process has improved picture quality and clarity.
If you notice any remaining issues with picture quality, repeat the cleaning steps or consider contacting LifeProof customer support for further assistance.
Following these nine steps ensures that your LifeProof case camera lens remains clean and free from dirt, smudges, and other contaminants that can affect photo and video quality.
Regular cleaning helps maintain optimal performance and extends the lifespan of your LifeProof case.
5 methods to clean lifeproof case camera lens
Certainly! Here are five methods to clean a LifeProof case camera lens, explained in detail:
Method 1: Microfiber Cloth Cleaning
Using a microfiber cloth is one of the gentlest and most effective ways to clean the camera lens on your LifeProof case:
- Prepare the Cloth: Start by ensuring your microfiber cloth is clean and free of any debris or dirt particles that could scratch the lens. If necessary, wash the cloth with mild soap and water, then rinse thoroughly and allow it to air dry.
- Remove the Case: Carefully detach the LifeProof case from your phone to access the camera lens. This step prevents accidental damage to your phone and allows for thorough cleaning.
- Inspect the Lens: Before cleaning, inspect the camera lens for any visible smudges, fingerprints, or dust. Identifying areas that need attention will help you focus your cleaning efforts effectively.
- Wipe Gently: Using the dry microfiber cloth, gently wipe the camera lens cover in a circular motion. Start from the center of the lens and move outward to ensure even cleaning. Apply light pressure to lift off any dirt or smudges without scratching the lens cover.
- Repeat if Necessary: If there are stubborn smudges or dirt spots, repeat the gentle wiping process with the microfiber cloth. Avoid using excessive force or abrasive materials, as these can damage the lens cover or remove protective coatings.
- Reassemble the Case: Once the lens cover is clean, carefully reassemble the LifeProof case onto your phone. Ensure all seals and closures are securely fastened to maintain the case’s waterproof and dustproof properties.
- Test Camera Functionality: After cleaning and reassembly, test the camera functionality by taking a few test photos or videos. Check for improved picture quality and clarity to ensure the cleaning process was successful.
Microfiber cloths are ideal for cleaning delicate surfaces like camera lenses because they are lint-free and non-abrasive.
Regularly cleaning the lens cover with a microfiber cloth helps maintain optimal photo and video quality while prolonging the lifespan of your LifeProof case.
Method 2: Isopropyl Alcohol and Cotton Swab
Using isopropyl alcohol (rubbing alcohol) and a cotton swab provides a more thorough cleaning method for stubborn dirt or residue on the camera lens:
- Prepare the Materials: Gather a bottle of isopropyl alcohol (70% or higher concentration) and a few cotton swabs. Isopropyl alcohol effectively removes oils, fingerprints, and other residues without damaging the lens cover.
- Remove the Case: Take the LifeProof case off your phone to access the camera lens. This step prevents accidental spills onto your phone and allows for more precise cleaning.
- Inspect and Target Areas: Before cleaning, inspect the camera lens for any visible smudges or residues. Use the cotton swab to target specific areas with stubborn dirt or fingerprints.
- Dampen the Cotton Swab: Dip the tip of a cotton swab into isopropyl alcohol. Make sure the swab is damp but not dripping wet. Excess alcohol can seep into the case and potentially damage the phone.
- Clean in Circular Motion: Gently rub the dampened cotton swab over the camera lens cover in a circular motion. Start from the center and work your way outward to ensure thorough cleaning. Use light pressure to lift off dirt and smudges effectively.
- Dry with a Microfiber Cloth: After cleaning, use a dry microfiber cloth to gently wipe away any remaining alcohol or residue from the lens cover. This step helps prevent streaks and ensures the lens cover is dry before reassembly.
- Reassemble the Case: Once the lens cover is clean and dry, carefully reassemble the LifeProof case onto your phone. Ensure all seals and closures are securely fastened to maintain the case’s waterproof and dustproof properties.
- Test Camera Functionality: After cleaning and reassembly, test the camera functionality by taking a few test photos or videos. Check for improved picture quality and clarity to ensure the cleaning process was successful.
Using isopropyl alcohol and cotton swabs is effective for removing stubborn residues from the camera lens cover. However, be cautious with the amount of alcohol used to avoid damaging the lens cover or other components of the LifeProof case.
Method 3: Soap and Water Solution
Cleaning the camera lens with a mild soap and water solution is a safe and effective method to remove dirt, grease, and smudges:
Here, can you put a polaroid camera in a checked bag?
- Prepare the Solution: Mix a small amount of mild liquid soap or dishwashing detergent with lukewarm water in a bowl or container. Avoid using harsh chemicals or abrasive cleaners that could damage the lens cover or the LifeProof case.
- Remove the Case: Take the LifeProof case off your phone to access the camera lens. This step prevents accidental spills onto your phone and allows for thorough cleaning.
- Inspect and Target Areas: Before cleaning, inspect the camera lens for any visible smudges, fingerprints, or dirt. Identify areas that need more attention to focus your cleaning efforts effectively.
- Dampen a Microfiber Cloth: Dip a clean, soft microfiber cloth into the soap and water solution. Wring out excess liquid to ensure the cloth is damp but not dripping wet. A damp cloth helps to lift off dirt and smudges without saturating the lens cover.
- Clean in Circular Motion: Gently wipe the dampened microfiber cloth over the camera lens cover in a circular motion. Start from the center and work your way outward to ensure even cleaning. Apply light pressure to lift off dirt and smudges effectively.
- Rinse with Clean Water: After cleaning, rinse the camera lens cover with clean lukewarm water to remove any soap residue. Hold the case under gently running water to ensure thorough rinsing.
- Dry with a Microfiber Cloth: Use a dry microfiber cloth to gently dry the camera lens cover. Pat the lens cover dry rather than rubbing to prevent streaks or water spots. Ensure the lens cover is completely dry before reassembling the LifeProof case onto your phone.
- Reassemble the Case: Once the lens cover is clean and dry, carefully reassemble the LifeProof case onto your phone. Ensure all seals and closures are securely fastened to maintain the case’s waterproof and dustproof properties.
- Test Camera Functionality: After cleaning and reassembly, test the camera functionality by taking a few test photos or videos. Check for improved picture quality and clarity to ensure the cleaning process was successful.
Cleaning the camera lens with a soap and water solution is effective for removing dirt and smudges without damaging the lens cover or the LifeProof case. This method is safe for regular maintenance to ensure optimal photo and video quality.
Method 4: Toothpaste or Baking Soda Paste
Using toothpaste or a baking soda paste can help remove light scratches and stubborn residues from the camera lens cover:
- Prepare the Paste: For toothpaste, choose a non-gel, non-abrasive toothpaste. For baking soda paste, mix baking soda with a small amount of water to form a thick paste. Both options provide mild abrasives that can help polish the lens cover.
- Remove the Case: Take the LifeProof case off your phone to access the camera lens. This step prevents accidental spills onto your phone and allows for precise cleaning.
- Inspect and Target Areas: Before applying the paste, inspect the camera lens for scratches or stubborn residues. Target areas that need more attention to focus your cleaning efforts effectively.
- Apply the Paste: Apply a small amount of toothpaste or baking soda paste directly onto the camera lens cover. Use a cotton swab or soft cloth to spread the paste evenly over the scratched or dirty areas.
- Buff in Circular Motion: Gently buff the paste into the camera lens cover using a soft cloth or cotton swab. Use light pressure and a circular motion to polish the lens cover and lift off dirt, scratches, or residues.
- Rinse with Clean Water: After buffing, rinse the camera lens cover with clean lukewarm water to remove any residue from the paste. Hold the case under gently running water to ensure thorough rinsing.
- Dry with a Microfiber Cloth: Use a dry microfiber cloth to gently dry the camera lens cover. Pat the lens cover dry rather than rubbing to prevent streaks or water spots. Ensure the lens cover is completely dry before reassembling the LifeProof case onto your phone.
- Reassemble the Case: Once the lens cover is clean and dry, carefully reassemble the LifeProof case onto your phone. Ensure all seals and closures are securely fastened to maintain the case’s waterproof and dustproof properties.
- Test Camera Functionality: After cleaning and reassembly, test the camera functionality by taking a few test photos or videos. Check for improved picture quality and clarity to ensure the cleaning process was successful.
Using toothpaste or baking soda paste can help polish minor scratches and remove stubborn residues from the camera lens cover. However, be cautious with abrasive materials to avoid causing further damage to the lens cover or the LifeProof case.
Method 5: Commercial Lens Cleaning Solution
Using a commercial lens cleaning solution designed for camera lenses or eyeglasses offers a safe and effective method to clean the camera lens on your LifeProof case:
Here, how to make a insulated camera bag?
- Choose the Solution: Select a commercial lens cleaning solution that is specifically formulated for cleaning delicate surfaces like camera lenses. Avoid using solutions that contain alcohol or harsh chemicals that could damage the lens cover or the LifeProof case.
- Remove the Case: Take the LifeProof case off your phone to access the camera lens. This step prevents accidental spills onto your phone and allows for precise cleaning.
- Inspect and Target Areas: Before applying the solution, inspect.
5 Benefits to clean lifeproof case camera lens
Benefit 1: Improved Photo and Video Quality
Regularly cleaning the camera lens on your LifeProof case significantly improves the quality of photos and videos captured by your phone.
A clean lens ensures that there are no smudges, fingerprints, or dirt particles obstructing the camera’s view.
This clarity translates directly into sharper images and clearer videos with better contrast and color accuracy.
Whether you’re capturing landscapes, portraits, or close-up shots, a clean lens allows your phone’s camera to perform at its best, capturing details with precision and vibrancy.
Benefit 2: Prevention of Blurriness and Distortion
Cleaning the camera lens helps prevent blurriness and distortion in photos and videos.
Dirt, dust, and smudges on the lens cover can cause light to scatter or refract irregularly, resulting in blurry or hazy images.
By keeping the lens clean, you ensure that the camera can focus accurately and capture sharp images without any unwanted distortions.
This is particularly important in low-light conditions or when capturing fast-moving subjects where clarity and detail are crucial.
Benefit 3: Extended Lifespan of the LifeProof Case
Regularly cleaning the camera lens as part of maintaining your LifeProof case extends its overall lifespan.
A clean lens cover is less prone to scratches and damage that could compromise its functionality or effectiveness in protecting your phone.
By preventing dirt buildup and ensuring the lens remains clear, you reduce the risk of needing to replace the case due to reduced performance or damage over time.
This maintenance not only saves money but also ensures that your phone remains protected and functional for longer periods.
Benefit 4: Enhanced Waterproof and Dustproof Performance
The cleanliness of the camera lens can impact the overall waterproof and dustproof performance of your LifeProof case.
Dirt or debris on the lens cover can compromise the integrity of the case’s seals and closures, potentially allowing water or dust to penetrate and reach your phone.
By keeping the lens clean, you maintain the effectiveness of the case’s waterproof and dustproof features, ensuring that your phone remains protected in various environmental conditions, including underwater or in dusty environments.
Benefit 5: Improved Hygiene and Aesthetics
Cleaning the camera lens not only improves the functionality of your LifeProof case but also enhances its aesthetics and hygiene.
A clean lens cover gives your phone a polished look, free from smudges or fingerprints that can detract from its appearance.
Moreover, regular cleaning reduces the buildup of bacteria or germs that can accumulate on dirty surfaces, promoting better hygiene and cleanliness.
This is especially important if you use your phone frequently or share it with others, as a clean lens contributes to an overall more pleasant and sanitary user experience.
How to clean lifeproof case camera lens iphone 13
To clean the camera lens on your LifeProof case for iPhone 13, follow these steps:
- Remove the Case: Carefully detach the LifeProof case from your iPhone 13.
- Inspect the Lens: Check the camera lens for any smudges, fingerprints, or dirt that need cleaning.
- Use a Microfiber Cloth: Wipe the camera lens gently with a clean, dry microfiber cloth to remove any loose dirt or smudges. This cloth is gentle and won’t scratch the lens.
- Dampen the Cloth (Optional): If needed, dampen the microfiber cloth with a small amount of water or a mild soap solution. Ensure the cloth is not dripping wet.
- Wipe the Lens: Gently wipe the camera lens in a circular motion with the dampened cloth to remove stubborn smudges or dirt.
- Dry with a Dry Cloth: Use a dry microfiber cloth to dry the lens after cleaning to prevent water spots.
- Reassemble the Case: Once the lens is clean and dry, carefully reattach the LifeProof case onto your iPhone 13, ensuring all seals are properly closed to maintain its waterproof and dustproof properties.
Regularly cleaning the camera lens helps maintain photo quality and ensures your LifeProof case continues to protect your iPhone effectively.
How to clean lifeproof case camera lens iphone 11
To clean the camera lens on your LifeProof case for iPhone 11, follow these steps:
- Remove the Case: Carefully remove the LifeProof case from your iPhone 11.
- Inspect the Lens: Check the camera lens for any smudges, fingerprints, or dirt that need cleaning.
- Use a Microfiber Cloth: Start by gently wiping the camera lens with a clean, dry microfiber cloth. This helps remove loose dirt and smudges without scratching the lens.
- Dampen the Cloth (Optional): If there are stubborn smudges, dampen the microfiber cloth with a small amount of water or a mild soap solution. Ensure the cloth is not excessively wet.
- Clean the Lens: Gently wipe the camera lens in a circular motion with the dampened cloth to lift off any remaining dirt or smudges.
- Dry with a Dry Cloth: Use a dry microfiber cloth to dry the lens after cleaning to prevent water spots or streaks.
- Reassemble the Case: Once the lens is clean and dry, carefully reattach the LifeProof case onto your iPhone 11. Ensure all seals are properly closed to maintain its waterproof and dustproof properties.
Regular cleaning helps maintain the clarity of your iPhone 11’s camera lens and ensures optimal photo and video quality through your LifeProof case.
How to clean lifeproof case camera lens iphone 12
To clean the camera lens on your LifeProof case for the iPhone 12, follow these steps:

- Remove the Case: Take your iPhone out of the LifeProof case carefully to access the lens area without any obstruction.
- Use a Lens Cleaning Cloth: Choose a soft, lint-free microfiber cloth designed for cleaning lenses. Gently wipe the camera lens in a circular motion to remove any fingerprints, dust, or smudges.
- Use Lens Cleaner (if needed): If there are stubborn smudges or dirt, dampen a corner of the cloth with lens cleaner or water. Avoid getting moisture into the openings of the case.
- Inspect and Reassemble: After cleaning, inspect the lens to ensure it’s clear. Once satisfied, carefully place your iPhone back into the LifeProof case, making sure it fits securely.
- Regular Maintenance: Clean the lens regularly to prevent buildup and maintain optimal photo and video quality.
By following these steps, you can keep your LifeProof case’s camera lens clean and your iPhone 12 ready for capturing clear, sharp images.
Related faq’s
Can I clean the camera lens while my iPhone is still in the LifeProof case?
It’s generally recommended to remove your iPhone from the LifeProof case before cleaning the camera lens.
This ensures you can access the lens directly and clean it thoroughly without any obstruction.
What should I use to clean the camera lens of my LifeProof case?
Use a soft, lint-free microfiber cloth to clean the camera lens. Avoid using harsh chemicals or abrasive materials that could scratch the lens or damage the protective coating on your LifeProof case.
How often should I clean the camera lens on my LifeProof case?
It’s a good idea to clean the camera lens regularly, especially if you notice smudges or dirt affecting your photos.
Depending on use and environmental conditions, cleaning every few days to once a week may be necessary.
Can I use water or lens cleaner to clean the lens?
Yes, you can use water or a mild lens cleaner on the microfiber cloth if needed.
Dampen a corner of the cloth slightly and gently wipe the lens in a circular motion to remove stubborn fingerprints or smudges. Avoid getting moisture into the openings of the case.
Should I clean both the front and rear camera lenses of my LifeProof case?
Yes, if your LifeProof case covers both the front and rear camera lenses, it’s important to clean both regularly.
This ensures that both cameras deliver clear, high-quality photos and videos without any obstruction or smudges.
Conclusion:
In conclusion, keeping the camera lens of your LifeProof case clean is essential for maintaining the clarity and quality of your iPhone photos and videos.
Use a soft microfiber cloth regularly to gently wipe away fingerprints, dust, and smudges.
If necessary, lightly dampen the cloth with water or a mild lens cleaner, ensuring not to introduce moisture into the case’s openings.
By incorporating regular lens maintenance into your routine, you can ensure that your LifeProof case protects your iPhone’s camera effectively while consistently delivering clear and sharp images.


