
How do you create a DSLR camera bag insert that perfectly fits your gear and offers ultimate protection?
In this guide, we’ll show you how to make a custom insert to keep your camera and lenses safe and organized.
First, we’ll cover the materials you need and provide step-by-step instructions for measuring, cutting, and assembling your insert.
Then, we’ll share tips on customizing it to suit your specific needs, whether you’re a professional or a hobbyist.
Ready to transform your camera bag into a well-organized, protective case? Let’s dive into the details and get started on your DIY DSLR camera bag insert project!
Here how to make a camera domke camera bag?
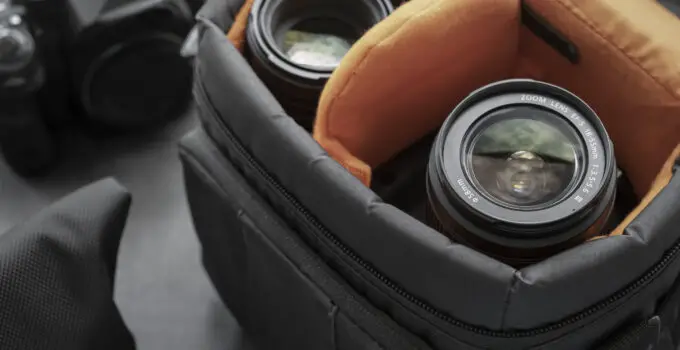
What is DSLR camera bag insert?
A DSLR camera bag insert is a protective, padded compartment designed to fit inside a larger bag, transforming it into a camera bag.
These inserts are typically made from durable materials with adjustable, padded dividers that can be rearranged to accommodate different camera bodies, lenses, and accessories.
The primary purpose is to provide a customizable and secure space for camera equipment, ensuring it is protected from impact, scratches, and other potential damage.

DSLR camera bag inserts come in various sizes to fit different types of bags, such as backpacks, messenger bags, or suitcases, offering photographers flexibility and convenience.
This allows photographers to use their favorite everyday bag for camera gear, rather than investing in a separate, often more expensive, dedicated camera bag.
Overall, DSLR camera bag inserts are an affordable and practical solution for safely carrying photography equipment.
Here, how to make a camera tripod bag?
Why to use DSLR camera bag insert?
Are camera bag insert worth it?
Whether a camera bag insert is worth it depends on individual preferences and needs.
For photographers who already own a suitable bag, such as a backpack or messenger bag, a camera bag insert can be a cost-effective way to convert it into a camera bag.
This option provides flexibility, allowing photographers to use their preferred bag while still protecting and organizing their gear.
However, for photographers who frequently carry a significant amount of equipment or require specialized features like weatherproofing or additional padding, investing in a dedicated camera bag might be more worthwhile.
Dedicated camera bags often offer more specific protection and organization tailored to photography equipment.
Ultimately, the decision comes down to factors such as budget, the amount of gear being carried, desired features, and personal preferences regarding style and convenience.
It’s worth considering the specific needs and usage patterns before deciding whether a camera bag insert is worth it.
Things to know before making a dslr camera bag
Before investing in a DSLR camera bag, there are several key factors to consider.
Firstly, assess the amount of gear you need to carry regularly, including camera bodies, lenses, accessories, and personal items. This helps determine the size and capacity of the bag needed.
Secondly, consider the level of protection required for your gear.
Here, how to make a camera lens bag?
Look for bags with padded compartments, adjustable dividers, and durable materials to safeguard equipment from impact and environmental elements.
Additionally, think about the bag’s comfort and convenience features, such as padded shoulder straps, waist belts for weight distribution, and easy-access pockets for quick retrieval of frequently used items.
It’s also essential to evaluate the bag’s compatibility with your shooting style and environment.
For example, if you often shoot outdoors in rough terrain, opt for a weatherproof and rugged bag.
Lastly, consider factors like budget, brand reputation, warranty, and user reviews to make an informed decision before purchasing a DSLR camera bag.
How to make a dslr camera bag insert?
To make a DIY DSLR camera bag insert, you’ll need a few materials and basic sewing skills:
- Materials Needed:
- Foam padding or thick cushioning material
- Fabric for the outer layer (preferably durable and water-resistant)
- Fabric for the inner lining (soft material to protect camera gear)
- Velcro strips or zippers for closures
- Sewing machine or needle and thread
- Measure and Cut:
- Measure the dimensions of your camera bag to determine the size of the insert needed.
- Cut the foam padding into pieces according to your gear’s dimensions, leaving extra space for seam allowances.
- Sew the Inner Lining:
- Sew the inner lining fabric into compartments to fit your camera bodies, lenses, and accessories. Add dividers using fabric or foam to keep items separated.
- Attach Outer Layer:
- Sew the outer layer fabric around the padded compartments, leaving openings for closures like Velcro or zippers.
- Add Closures:
- Attach Velcro strips or zippers to the openings to secure the insert inside your camera bag.
- Test and Adjust:
- Place your camera gear inside the insert to ensure a proper fit and adjust any compartments or closures as needed.
By following these steps, you can create a custom DSLR camera bag insert that provides protection and organization for your photography equipment.
9 steps to make a DSLR Camera bag insert?
Step 1: Gather Materials and Tools
Before starting, gather all the materials and tools you’ll need for making a DSLR camera bag insert. You’ll require:
- Foam padding or thick cushioning material
- Durable and water-resistant fabric for the outer layer
- Soft fabric for the inner lining
- Velcro strips or zippers for closures
- Sewing machine or needle and thread
Ensure you have the correct measurements of your camera bag to determine the size of the insert required.
Step 2: Measure and Cut the Foam Padding
Using the measurements of your camera bag and gear, cut the foam padding into pieces.
It’s crucial to leave some extra space around each item for seam allowances. The foam padding will provide the necessary cushioning and protection for your camera equipment.
Step 3: Prepare the Inner Lining
Cut the soft fabric for the inner lining into panels that will form the compartments for your camera bodies, lenses, and accessories.
Here, how to make a camera bag waterproof?
You can customize the size and shape of each compartment based on your gear. Consider adding dividers using fabric or additional foam padding to keep items organized and secure.
Step 4: Sew the Compartments
Using a sewing machine or needle and thread, sew the inner lining fabric panels together to create compartments.
Stitch along the edges to ensure the compartments are sturdy and well-defined. Double-check the measurements to ensure each compartment fits your gear correctly.
Step 5: Attach Dividers (if needed)
If you want to further organize your gear, attach dividers inside the compartments.
These dividers can be made from fabric or foam and can be sewn or glued in place. Dividers help prevent items from shifting during transportation, reducing the risk of damage.
Step 6: Sew the Outer Layer
Next, sew the durable and water-resistant fabric for the outer layer around the padded compartments.
Leave openings at the top or sides for closures like Velcro strips or zippers. The outer layer adds an extra layer of protection and enhances the bag’s durability.
Step 7: Add Closures
Attach Velcro strips or sew zippers to the openings of the outer layer.
Velcro provides a quick and easy closure, while zippers offer a more secure seal. Ensure the closures are firmly attached and can withstand frequent use without coming loose.
Step 8: Test Fit and Adjustments
Before finishing, test the insert by placing your camera gear inside.
Ensure that each item fits comfortably within its designated compartment and that the closures securely fasten the insert. Make any necessary adjustments to the compartments or closures for a perfect fit.
Step 9: Finalize and Secure
Once you’re satisfied with the fit and functionality, finalize the insert by reinforcing seams and securing loose threads. Trim any excess fabric for a neat and professional finish.
Your DIY DSLR camera bag insert is now ready to protect and organize your photography equipment during travel and shoots.
Here, does camera bag count as a personal item.
Cheap DIV camera bag insert idea
Innovative and Affordable DIY DSLR Camera Bag Insert Idea
Creating a cheap DSLR camera bag insert involves repurposing readily available materials to provide protection and organization for your camera gear without breaking the bank.
Here’s a creative and budget-friendly idea:
Step 1: Gather Materials
For this project, gather materials that you may already have or can easily obtain inexpensively:
- Cardboard or thick corrugated board
- Old T-shirts or soft fabric
- Adhesive or glue
- Scissors or cutting tool
- Ruler or measuring tape
Step 2: Measure and Cut the Cardboard
Measure the dimensions of your camera bag to determine the size of the insert needed.
Use cardboard or thick corrugated board to cut pieces that will form the base and sides of the insert. Cut the cardboard with precision to ensure a snug fit inside your bag.
Step 3: Prepare Fabric Padding
Cut old T-shirts or soft fabric into strips or squares to create padding for your gear. These fabric pieces will provide cushioning and protection for your camera equipment.
Step 4: Layer and Glue
Layer the fabric padding on top of the cardboard base, ensuring even coverage.
Use adhesive or glue to securely attach the fabric to the cardboard. Press down firmly to eliminate any air bubbles and ensure a strong bond.
Step 5: Create Compartments
Using additional cardboard pieces or folded fabric walls, create compartments within the insert to accommodate your camera bodies, lenses, and accessories.
Customize the size and layout of compartments based on your gear.
Step 6: Finalize and Test Fit
Secure all edges and seams with extra adhesive or tape for reinforcement.

Once the insert is complete, test fit it inside your camera bag to ensure a proper fit and functionality. Make any necessary adjustments to compartments or padding.
Step 7: Enhance with Fabric Cover (Optional)
For a more finished look, cover the cardboard insert with fabric using adhesive or sewing. This step adds a touch of aesthetics and extra protection to your DIY camera bag insert.
This innovative DIY DSLR camera bag insert idea offers a cost-effective way to protect and organize your gear, making it perfect for budget-conscious photographers.
Related faq’s
How to make a camera insert?
To make a camera insert, follow these steps:
- Measure your camera bag’s interior.
- Cut foam padding to fit the bag’s dimensions.
- Cut fabric for the outer layer and inner lining.
- Sew the inner lining into compartments for gear.
- Attach dividers inside compartments if needed.
- Sew the outer layer around padded compartments.
- Add closures like Velcro or zippers.
- Test fit the insert in your camera bag.
- Make any adjustments for a perfect fit.
This DIY camera insert provides protection and organization for your photography equipment.
How do you keep a DSLR camera in a bag?
To keep a DSLR camera in a bag:
- Use a padded camera bag to protect it from impacts.
- Insert the camera with the lens facing down to prevent damage.
- Use dividers to separate and organize camera bodies, lenses, and accessories.
- Place fragile items in padded compartments.
- Secure straps and closures to prevent items from shifting.
- Avoid overcrowding the bag to prevent pressure on the camera.
- Consider using silica gel packs to control moisture.
- Always handle the bag with care to avoid sudden impacts or drops.
Can you make your own camera bag?
Yes, you can make your own camera bag.
Start by choosing a sturdy, durable fabric and foam padding for protection. Measure and cut the fabric to create compartments for your camera and accessories.
Sew the fabric pieces together, adding padding to protect the gear. Include adjustable dividers for flexibility. Attach closures like zippers or Velcro to secure the bag.
Add straps or handles for easy carrying. Ensure all seams are reinforced for durability.
Customizing your bag allows you to tailor it to your specific needs, offering a practical and personalized solution for carrying your camera equipment.
Conclusion:
Creating a DSLR camera bag insert involves measuring and cutting foam padding, sewing durable fabric for compartments, and adding adjustable dividers.
This DIY project offers a cost-effective and customizable way to protect and organize your camera gear, ensuring it fits perfectly inside your existing bag while providing essential protection.


