When it comes to photography, having the right gear is crucial for capturing those perfect shots. One essential accessory for any photographer is a camera bag. Where you might wonder how to set up a camera bag?
Mirrorless camera bags provide excellent protection and convenience for your equipment, but without proper organization, they can quickly become a jumbled mess. This is where camera bag dividers come into play.
In this article, we will discuss the importance of mirrorless camera bag dividers and guide you through the process of setting them up to maximize your gear organization.
Understanding the Importance of Mirrorless Camera Bag Dividers
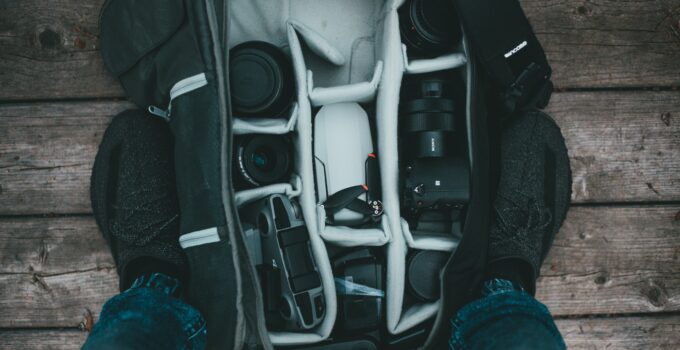
Camera bag dividers serve as partitions within your camera bag, allowing you to create customized compartments for your gear.
They help protect your equipment from potential damage caused by collisions or friction when items are packed tightly together.
By keeping your gear separate and secure, dividers ensure easy access to specific items during shoots, preventing valuable time wasted searching through a cluttered bag.
Choosing the Right Mirrorless Camera Bag
Before diving into setting up dividers, it’s essential to choose a camera bag that suits your needs.
Consider factors such as size, durability, comfort, and accessibility.
Look for bags specifically designed for mirrorless cameras, as they often come with dividers or customizable compartments.
Types of Camera Bag Dividers
Camera bag dividers come in various materials and designs. The most common types include foam dividers, padded dividers, and adjustable Velcro dividers.
Foam dividers provide excellent protection and can be cut to fit your specific gear, while padded dividers offer additional cushioning.
Adjustable Velcro dividers are versatile and allow you to customize the layout of your camera bag easily.
Step-by-Step Guide to Setting Up Mirrorless Camera Bag Dividers
Setting up mirrorless camera bag dividers typically involves the following steps:
1. Empty the bag:
Start by emptying your camera bag completely. Remove all the items that are currently inside the bag, including any existing dividers.
2. Plan the layout:
Consider the equipment you want to carry in the bag, such as your mirrorless camera body, lenses, batteries, and other accessories. Think about how you want to arrange them and plan the layout accordingly.
3. Locate the divider inserts:
Most camera bags come with divider inserts that can be rearranged to create customized compartments. Locate these inserts, which are usually made of padded fabric or foam.

4. Measure and cut dividers:
Measure the length required for each compartment and use a pair of scissors or a utility knife to cut the divider inserts accordingly. Take accurate measurements to ensure the dividers fit snugly inside the bag.
5. Insert dividers:
Insert the dividers into the bag, positioning them according to your planned layout.
Slide them in vertically to create separate compartments for each item. Make sure the dividers are securely placed, providing enough support and protection for your gear.
6. Adjust and secure dividers:
Once the dividers are inserted, adjust their positions if necessary. You can move them slightly to create larger or smaller compartments based on your needs.
Ensure that the dividers are tightly secured in place, preventing them from shifting during transport.
7. Organize your gear:
After securing the dividers, start organizing your camera equipment inside the bag. Place your mirrorless camera body, lenses, batteries, and other accessories into their designated compartments.
Keep in mind the weight distribution and try to balance the load to prevent any potential damage.
Remember, the purpose of dividers is to protect and organize your camera gear, so take your time to set them up in a way that best suits your needs.
Experiment with different arrangements until you find the configuration that works best for you.
Organizing Your Camera Gear Efficiently
Now that you have set up your dividers, it’s time to organize your camera gear effectively. Here are a few tips to keep in mind:
1. Categorize your equipment:
Group similar items together, such as lenses, camera bodies, or accessories, to create designated sections within your bag. This helps you quickly locate the gear you need during a shoot.
2. Consider frequency of use:
Place the equipment you use most often in easily accessible compartments. This saves time and ensures that your frequently used gear is within reach whenever you need it.
3. Protect fragile items:
Use additional padding or protective cases for delicate items like lenses or filters. This provides an extra layer of security against accidental bumps or impacts.
4. Utilize pockets and compartments:
Take advantage of the various pockets and compartments in your camera bag. Use them to store smaller accessories such as memory cards, batteries, lens caps, or cleaning kits.
This helps keep everything organized and prevents small items from getting lost.
5. Label compartments:
Consider labeling or color-coding your compartments to further streamline organization. This makes it easier to identify specific items, especially when working in fast-paced environments.
Tips for Protecting Your Equipment
Ensuring the safety of your camera gear is essential for any photographer. Here are some tips to protect your equipment:

1. Invest in a quality bag:
Choose a camera bag made from durable materials that provide adequate padding and protection. Look for features like water resistance or weather sealing for added security against the elements.
2. Handle with care:
Always handle your camera gear with caution. Avoid dropping or mishandling your equipment, as this can lead to costly repairs or irreparable damage.
3. Use lens caps and covers:
When not in use, protect your lenses with lens caps or covers. This prevents dust, scratches, or accidental touches that could damage the lens surface.
4. Avoid extreme temperatures:
Extreme heat or cold can harm your camera and its components. Avoid exposing your gear to direct sunlight or leaving it in freezing temperatures for extended periods. Use protective cases or bags to shield your equipment when necessary.
5. Regular maintenance:
Clean your gear regularly to remove dust, dirt, and fingerprints. Use appropriate cleaning tools and follow manufacturer guidelines to prevent damage during the cleaning process.
Maintaining and Cleaning Your Camera Bag
Keeping your camera bag clean and well-maintained ensures its longevity and functionality. Here are some maintenance tips:
- Empty and inspect: Regularly empty your camera bag and inspect it for any debris, loose threads, or wear and tear. Address any issues promptly to prevent further damage.
- Clean the interior: Use a soft brush or vacuum cleaner attachment to remove any dirt or debris from the interior of your camera bag. This helps maintain a clean and dust-free environment for your gear.
- Spot clean: If your camera bag gets dirty, spot clean it with a damp cloth or a mild detergent solution. Avoid soaking the bag or using harsh chemicals that could damage the fabric or material.
- Dry thoroughly: After cleaning, allow your camera bag to air dry completely before storing your equipment inside. This prevents the growth of mold or mildew.
Additional Accessories for Camera Bag Organization
In addition to dividers, several accessories can further enhance your camera bag’s organization and functionality. Consider the following options:
- Pouches and inserts: Use pouches or inserts designed specifically for camera bags to create additional compartments for small items like cables, filters, or lens hoods.
- Cable organizers: Keep your cables neat and tangle-free by using cable organizers. These small accessories help prevent
Here check out how to put back together a nikon camera bag.
Additional Accessories for Camera Bag Organization
In addition to dividers, several accessories can further enhance your camera bag’s organization and functionality. Consider the following options:
- Pouches and inserts: Use pouches or inserts designed specifically for camera bags to create additional compartments for small items like cables, filters, or lens hoods.
- Cable organizers: Keep your cables neat and tangle-free by using cable organizers. These small accessories help prevent cords from getting tangled and make it easier to locate the right cable when needed.
- Memory card holders: Invest in a dedicated memory card holder or case to keep your memory cards safe and organized. These holders typically have slots or compartments for different card types and provide protection against dust and moisture.
- Tripod holders: If you frequently use a tripod, consider a camera bag with a built-in tripod holder or use separate tripod straps or bags to securely transport your tripod.
- Accessory organizers: Look for camera bag inserts or organizers with specific compartments for items like batteries, chargers, lens filters, or cleaning kits. These organizers help keep your accessories easily accessible and prevent them from getting lost or damaged.
Here you can check out what to put in camera bag?
FAQs
Do all camera bags come with dividers?
Not all camera bags come with dividers. However, many camera bags designed specifically for photographers, especially those tailored for mirrorless cameras, often include dividers or customizable compartments.
Can I use dividers from one camera bag in another?
In some cases, dividers from one camera bag may fit into another if they have similar dimensions. However, it’s important to check compatibility and ensure a snug fit to provide adequate protection for your gear.
Are there alternative solutions to dividers for organizing camera bags?
Yes, there are alternative solutions such as camera bag inserts, pouches, or organizers that can be used to create compartments and keep your gear organized. These options provide flexibility and customization based on your specific needs.
How often should I clean my camera bag?
It’s a good practice to clean your camera bag regularly, especially if you frequently shoot in dusty or dirty environments.
Aim to clean it every few months or as needed to maintain cleanliness and prevent debris from accumulating.
What should I do if my camera bag gets wet?
If your camera bag gets wet, quickly remove any equipment from the bag and wipe it dry with a soft cloth.
Allow the bag to air dry completely before storing your gear back inside. Avoid using direct heat sources, as they can damage the bag or equipment.
Conclusion
Setting up mirrorless camera bag dividers is an essential step in keeping your photography gear organized and protected.
By investing a little time and effort into organizing your camera bag, you can save valuable time during shoots and ensure that your equipment remains safe and in good condition.
Remember to choose the right camera bag, select dividers that suit your needs, and organize your gear efficiently.
By following the tips provided in this article, you’ll have a well-organized camera bag that allows you to focus on capturing amazing shots.


