Ever wondered how to transform an ordinary bag into a versatile camera bag without splurging on new gear?
With a few strategic tweaks and some creativity, you can repurpose almost any bag to securely hold and protect your camera equipment.
This guide will walk you through practical steps to convert a standard bag into a custom camera carrier, ensuring your gear stays organized and safe while on the go.
From adding padding to creating dedicated compartments, you’ll learn how to adapt your bag to meet the specific needs of your photography adventures, all while saving money and upcycling what you already have.
Here how to make your camera bag insert?
What is a messenger bag?
A messenger bag is a type of bag characterized by its single shoulder strap that allows it to be worn across the body.
Originally used by bike messengers for carrying documents and parcels, it has since evolved into a popular style for everyday use.
Typically, messenger bags feature a large main compartment with a flap closure that helps protect contents from the elements.
They often come with additional pockets and organizational features for items like pens, phones, and keys.
Made from durable materials such as canvas, leather, or nylon, they are designed to be both functional and stylish.
The cross-body strap distributes weight evenly, making it comfortable to carry for extended periods.
Ideal for work, school, or casual outings, messenger bags offer practicality and versatility while keeping hands free.
Is it worth to know how to turn a normal bag into a camera bag?
Turning a normal bag into a camera bag can be a worthwhile skill for photographers who need to adapt to different situations without investing in a specialized camera bag.
This DIY approach allows for customization to fit specific gear needs while maximizing the use of existing bags.
By adding padded dividers or inserts, you can create compartments to securely hold and protect camera bodies, lenses, and accessories.
This method can be more cost-effective than buying a new camera bag and also offers the flexibility to design a setup tailored to personal preferences.
Additionally, it can be useful for travel or casual shoots where a dedicated camera bag might be too bulky or conspicuous.
However, it’s important to ensure that the bag you modify provides adequate protection and organization to avoid potential damage to your equipment.
Here, how much does your camera bag weight?
It is important to know how to turn a normal bag into a camera bag?
Knowing how to turn a normal bag into a camera bag is important for several reasons. It allows you to repurpose an existing bag, which can be more cost-effective than buying a new camera-specific bag.
This skill also offers flexibility, as you can customize the bag’s interior to fit your unique gear and organizational needs. For those who travel or work in various environments, adapting a bag can help you blend in and avoid drawing unnecessary attention.
Additionally, it can be a practical solution for carrying camera equipment in less conventional settings where a dedicated camera bag might be impractical.
However, it’s crucial to ensure that the converted bag provides sufficient padding and protection to safeguard your equipment from damage.
Overall, this capability combines practicality and creativity, helping photographers make the most of their gear and resources.
Things to know before turning normal bag into a camera bag
Before turning a normal bag into a camera bag, consider several key factors to ensure it effectively protects your gear.
First, assess the bag’s size and shape to ensure it can accommodate your camera body, lenses, and accessories.
The bag should have enough space to fit your equipment comfortably without overcrowding.
Next, choose appropriate padding materials, such as foam or neoprene, to create custom compartments and provide shock absorption. Secure padding inside the bag to prevent movement and minimize impact during transport.
Additionally, think about accessibility; make sure you can easily reach and retrieve your camera gear when needed.
Consider the bag’s durability and weather resistance to protect against environmental elements.
Finally, ensure the bag has adjustable straps for a comfortable fit and easy carrying. Taking these steps will help you convert a regular bag into a functional and protective camera bag.
How to turn a normal bag into a camera bag?
To turn a normal bag into a camera bag, start by selecting a bag with a suitable size and shape to fit your camera gear.
Begin by adding padded dividers or inserts to create compartments for your camera body, lenses, and accessories.
You can use foam, neoprene, or even repurpose padded sleeves from other items. Secure the padding with Velcro or adhesive strips to prevent it from shifting.
Next, consider adding additional pockets or organizing elements for smaller accessories like memory cards and batteries.
Here, how much size amazon bag should you carry?
To protect your gear from the elements, you might want to add a rain cover or waterproof liner if the bag doesn’t already have one.
Finally, ensure the bag is comfortable to carry by adjusting the straps or adding cushioning where necessary. This DIY approach provides a custom solution for transporting your camera equipment safely and efficiently.
7 Steps to turn a normal bag into a camera bag
1. Choose the Right Bag
Selecting the appropriate bag is the first crucial step in converting it into a camera bag. Ideally, the bag should have enough space to accommodate your camera body, lenses, and accessories comfortably.
Look for a bag with a rectangular or slightly padded interior, as it provides a good starting point for adding custom compartments.
The bag’s dimensions should align with your camera gear, ensuring that everything fits snugly but not too tightly.
A bag with adjustable or removable straps is advantageous as it offers flexibility in carrying and organizing your equipment. If the bag has additional compartments or pockets, they can be repurposed for smaller accessories like memory cards or batteries.
Evaluate the bag’s overall durability and condition, as it needs to withstand the weight and movement of your camera gear.
Choosing a sturdy, well-constructed bag will provide a solid foundation for the conversion process and ensure the longevity of your modified camera bag.
2. Measure and Plan the Layout
Once you’ve chosen a suitable bag, the next step is to measure your camera gear and plan the layout of the internal compartments.
Use a measuring tape to determine the dimensions of your camera body, lenses, and accessories. Sketch a rough layout of how you want to organize these items within the bag.
Consider the accessibility of each item and how often you will need to access them.
Create a layout that allows easy access to frequently used equipment while securing less frequently used items.
This planning phase is crucial for ensuring that your bag is functional and efficient. It will also help you determine how much padding or dividers you will need and where to place them.
A well-thought-out layout ensures that your gear remains organized and protected, reducing the risk of damage during transport.
3. Add Padding and Dividers
Adding padding and dividers is essential for protecting your camera gear and organizing the interior of your bag. Start by cutting foam or neoprene to the sizes required for your planned compartments.
You can use adhesive Velcro strips or double-sided tape to attach these padding pieces to the interior walls of the bag.
Here, how to clean prade nylon bag?
Arrange the padding to create custom-fit compartments for your camera body, lenses, and accessories based on your earlier measurements and layout plan.
Ensure that each compartment is snug but not too tight, allowing for easy insertion and removal of your gear. Padding not only prevents items from shifting but also absorbs shocks and impacts, reducing the risk of damage.
For added protection, you might consider using padded dividers that are adjustable or removable, allowing for flexibility in your compartment sizes as needed. Properly installed padding is crucial for maintaining the safety and integrity of your equipment.
4. Secure the Padding
Securing the padding properly is vital to ensure that it stays in place and effectively protects your camera gear. Use strong adhesive Velcro strips or double-sided tape to attach the padding to the bag’s interior.
If the bag has existing linings or compartments, adhere the padding to these surfaces for added stability. Make sure the padding is firmly attached and won’t shift or move during use.
For added security, you can stitch the edges of the padding to the bag’s lining if you have sewing skills or access to a sewing machine.
Ensure that the padding is smooth and free of wrinkles, as uneven padding can lead to gaps where equipment might move or become damaged.
Properly secured padding will maintain the integrity of the compartments and offer consistent protection to your camera gear, enhancing the functionality and durability of your custom camera bag.
5. Add Additional Features
To enhance the functionality of your converted camera bag, consider adding additional features that cater to your specific needs. You can install extra pockets or pouches using Velcro or adhesive to hold smaller items like memory cards, batteries, or cleaning supplies.
Adding a rain cover or waterproof liner can protect your gear from moisture and environmental elements. If the bag lacks internal organization, consider incorporating small mesh or fabric organizers to keep accessories neat and accessible.
For added convenience, you might also attach a carabiner or key clip inside the bag for items like lens caps or cleaning cloths.
Here, how to keep a prade bag in shape?
Adjustable straps and dividers can further tailor the bag to fit different gear configurations. Enhancing your bag with these features will improve its overall functionality and usability, making it more versatile and suited to various shooting scenarios.
6. Test the Configuration
Testing the configuration of your newly converted camera bag is crucial to ensure that it meets your needs and provides adequate protection for your gear. Load your camera body, lenses, and accessories into the compartments you’ve created and check for proper fit and accessibility.
Make sure that each item is secure and doesn’t shift or move around during handling. Test the bag’s ease of use by retrieving and replacing gear to ensure that everything is easily accessible.
Assess the overall comfort and balance of the bag when carried, as a well-balanced bag will reduce strain and make transportation easier. If necessary, make adjustments to the padding, dividers, or additional features to improve the setup.
Testing helps identify any potential issues and allows you to fine-tune the bag to better suit your photography needs, ensuring that it functions effectively and efficiently in real-world scenarios.
7. Make Final Adjustments
After testing your converted camera bag, make any final adjustments to ensure optimal functionality and comfort.
Review the layout and organization of your gear, and adjust padding or dividers as needed for a better fit or improved accessibility.
If you noticed any issues during testing, such as insufficient protection or awkward carrying, address these concerns by adding more padding, adjusting compartments, or modifying straps.
Check that all added features, like extra pockets or rain covers, are securely attached and functional.
Ensure that the bag’s weight distribution is balanced and that it remains comfortable to carry. Fine-tuning these elements will enhance the bag’s performance and make it better suited to your specific needs.
Final adjustments ensure that your custom camera bag provides the best possible protection, organization, and ease of use, making it a valuable tool for your photography endeavors.
5 Methods to turn a normal bag into a camera bag
1. Using Foam Inserts
Foam inserts are a popular and effective method for converting a normal bag into a camera bag. This approach involves adding custom-cut foam pieces to create padded compartments within the bag.
Begin by measuring the dimensions of your camera, lenses, and accessories to determine the size of foam pieces needed.
Purchase high-density foam from a craft store or online. Cut the foam into sections that will fit snugly inside the bag’s interior, creating compartments for each piece of gear.
Use adhesive or Velcro strips to secure the foam in place, ensuring that it does not shift around. Arrange the foam to provide cushioning and protection, and make sure each compartment is well-defined to prevent your gear from moving.
Here, how to wear a manfrotto camera bag?
This method is highly customizable, allowing you to adjust the size and shape of compartments based on your specific needs. Foam inserts effectively absorb shocks and protect your equipment from bumps and drops. ‘
They are also relatively inexpensive and easy to replace if needed. However, it’s important to ensure that the foam fits well and does not overcrowd the bag, which could compromise comfort and accessibility.
2. Adding Padded Dividers
Padded dividers are another effective method for transforming a normal bag into a camera bag.
These dividers, often made from foam or padded fabric, can be added to create organized compartments inside the bag. Begin by measuring the interior of your bag and determining how many dividers you need.
You can purchase pre-made padded dividers from camera accessory stores or online, or make your own using materials like foam, fabric, and Velcro.
Install the dividers inside the bag using Velcro strips or adhesive tape. Arrange them to create custom-sized compartments for your camera body, lenses, and other accessories.
The dividers should be adjustable, allowing you to reconfigure them based on your equipment needs. This method provides flexibility and organization, helping to keep your gear secure and easily accessible.
Padded dividers also offer excellent protection against impacts and vibrations. Ensure that the dividers are securely attached and do not shift during use, as this could affect the safety and accessibility of your gear.
3. Using a Camera Insert Bag
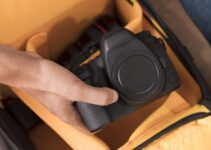
Camera insert bags are specially designed pouches that can be placed inside a normal bag to convert it into a camera bag.
These inserts are typically made from padded materials and feature multiple compartments to organize and protect camera equipment.
To use this method, first select an insert that fits well within the dimensions of your existing bag. Camera insert bags are available in various sizes and configurations, so choose one that matches your gear and the size of your bag.
Place the insert inside your normal bag, and adjust its position to ensure it fits snugly. The insert will provide padded protection and organized compartments for your camera body, lenses, and accessories.
This method is convenient as it offers a ready-made solution for converting a bag without extensive modifications. Additionally, it allows for easy transfer of your camera gear between different bags.
Ensure that the insert is securely positioned and does not move around, which could compromise the safety of your equipment. This method combines simplicity with effective protection and organization.
4. Custom Sewing Compartments
Custom sewing compartments involves creating and sewing padded compartments into a normal bag to tailor it for camera gear.
This method requires some sewing skills and materials such as fabric, foam padding, and thread. Begin by measuring the interior of your bag and designing a layout for your compartments.
Cut the fabric and foam padding to the appropriate sizes based on your design.
Here, how to wear a lowepro camera bag?
Sew the compartments directly into the bag, creating separate sections for your camera body, lenses, and accessories.
This method allows for a high degree of customization, enabling you to create a layout that perfectly fits your equipment. Use durable stitching and reinforce the seams to ensure that the compartments are strong and secure.
Custom sewing provides a permanent solution and can be highly effective in protecting and organizing your gear.
However, it requires sewing skills and tools, and any mistakes in measurement or sewing could impact the functionality of the bag. Ensure that all compartments are well-padded and securely attached to provide optimal protection.
5. Using a DIY Camera Insert
DIY camera inserts are a versatile and cost-effective way to convert a normal bag into a camera bag. This method involves creating your own custom insert using materials like foam, fabric, and Velcro.
Start by measuring the dimensions of your camera gear and the interior of your bag. Purchase foam or fabric from a craft store, and cut it into pieces that will fit your measurements.
Assemble the DIY insert by arranging the foam or fabric into compartments and securing them with Velcro or adhesive.
You can create a simple insert by lining the interior with foam or make a more complex design with adjustable sections. Place the DIY insert inside your normal bag, and adjust it to ensure a snug fit.
This method offers a high level of customization, allowing you to create a layout tailored to your gear. It is also an affordable solution compared to buying a pre-made camera insert.
Ensure that the DIY insert is well-padded and securely positioned to protect your camera equipment effectively.
5 Benefits to turn a normal bag into a camera bag
1. Cost-Effectiveness
Turning a normal bag into a camera bag can be significantly more cost-effective than purchasing a specialized camera bag.
Instead of investing in a new, often expensive camera bag, you repurpose an existing bag that you already own. This approach allows you to allocate your budget towards other photography essentials or upgrades.
By utilizing materials such as foam inserts or padded dividers, you can enhance your current bag’s functionality at a fraction of the cost of a new camera-specific bag.
This method provides an affordable solution for photographers who want to protect their gear without spending extra money.
2. Customization
Customizing a normal bag into a camera bag offers a high degree of personalization. You can tailor the interior layout to fit your specific camera gear, including the number and size of compartments.
This flexibility allows you to organize your equipment exactly how you need it, whether it’s for different camera bodies, lenses, or accessories.
You can also adjust padding and dividers to provide the exact level of protection and accessibility required for your gear.
This bespoke approach ensures that your camera bag meets your unique needs and preferences.
3. Versatility
A converted camera bag provides enhanced versatility compared to traditional camera bags. When you modify a normal bag, you can choose one that suits your style and needs, such as a messenger bag or a backpack.

This versatility allows you to carry your camera gear in a bag that fits different occasions, whether it’s for casual outings, travel, or work. Additionally, you can easily switch out the camera insert or padding to repurpose the bag for other uses when not carrying camera equipment.
This adaptability maximizes the bag’s utility beyond just photography.
4. Unique Style
Transforming a normal bag allows you to maintain your personal style. Many camera bags have a utilitarian design that may not align with your aesthetic preferences.
By repurposing a bag that reflects your style, such as a leather messenger bag or a trendy tote, you ensure that your camera gear is carried in a way that complements your fashion sense.
This method provides a unique and personalized touch to your gear, allowing you to stand out while still having the functionality needed to protect your equipment.
5. Eco-Friendly
Repurposing a normal bag into a camera bag is an environmentally friendly choice. Instead of buying a new camera bag, you extend the life of an existing item, reducing waste and the demand for new products.
This approach minimizes your environmental footprint by making use of materials you already have and avoiding the production and disposal of additional items.
Here, how to wear altura camera bag?
It aligns with sustainable practices by promoting reuse and reducing the need for new resources, contributing to a more eco-conscious lifestyle.
Related faq’s
What type of bag is best for converting into a camera bag?
The best type of bag for conversion is one with a sturdy structure and enough space to accommodate your camera gear.
Ideal options include messenger bags, backpacks, or large tote bags. Ensure the bag has a flat interior and, preferably, adjustable or removable compartments to facilitate the addition of padding and dividers.
How do I measure my camera gear for a custom conversion?
Measure the dimensions of your camera body, lenses, and accessories to ensure a snug fit. Use a tape measure or ruler to get accurate measurements of each item.
Record the dimensions and use these measurements to cut foam or fabric for compartments that will hold your gear securely.
What materials do I need for padding and dividers?
For padding and dividers, you can use high-density foam, neoprene, or padded fabric. Foam is commonly used for its shock-absorbing qualities, while neoprene provides both padding and flexibility.
Fabric can be used to create custom dividers or to cover foam inserts. Velcro strips or adhesive tape can be used to secure these materials in place.
How can I securely attach padding and dividers inside the bag?
Padding and dividers can be attached using Velcro strips, adhesive tape, or by sewing. Velcro allows for easy adjustments and repositioning, while adhesive tape provides a strong hold.
If you’re comfortable with sewing, stitching the padding or dividers directly to the bag’s lining can offer a more permanent solution.
Can I use a camera insert instead of custom padding?
Yes, a camera insert is a convenient alternative to custom padding. Camera inserts are pre-made padded pouches that fit inside your bag, offering organized compartments for your gear.
They are available in various sizes and configurations, making it easy to find one that fits your existing bag. Simply place the insert inside your bag to convert it into a camera bag.
How do I ensure my converted bag provides adequate protection for my gear?
To ensure adequate protection, check that the padding and dividers are well-cushioned and securely attached. Test the fit of your gear in the compartments to make sure it is snug and does not shift.
Ensure the bag’s exterior is durable and consider adding a rain cover or waterproof liner to protect against moisture.
Can I still use the converted bag for other purposes?
Yes, a converted camera bag can be used for other purposes.
Many conversion methods, such as adding removable dividers or using a camera insert, allow you to repurpose the bag for different uses when not carrying camera gear. For example, you can remove the padding and use the bag as a regular tote or messenger bag.
Conclusion
Turning a normal bag into a camera bag is a practical and cost-effective solution for photographers.
By utilizing foam inserts, padded dividers, or DIY camera inserts, you can customize a bag to securely fit and protect your camera gear. This approach allows for personal style, versatility, and environmental sustainability by repurposing existing items.
Ensure that the padding is secure and that the bag provides adequate protection and organization.
With thoughtful modifications, you can transform an ordinary bag into a functional and personalized camera bag, enhancing both your photography experience and daily convenience.

